lundi 1 janvier 2018

Fraisier


Preparation time: 45 minutes
Baking time: 10 to 12 minutes
Makes 6 to 8 servings

Ingredients for the biscuit joconde
165g icing sugar
165g almond meal/flour
220g eggs, at room temperature
40g all-purpose flour
105g egg withes, at room temperature
30g caster sugar
50g unsalted butter, melted at room temperature

Ingredients for the mousseline cream
225g whole milk (3,5% fat)
66g granulated sugar, divided in 2 portions of 33g
1 vanilla bean
12g cornstarch
6g all-purpose flour
3 large egg yolks
73g butter, softened
Ingredients for the syrup
1 cup water
1/2 cup granulated sugar
2 tablespoons raspberry liqueur

Ingredients for the chantilly cream
200ml heavy cream
3 tablespoons granulated sugar
1/2 vanilla bean

To assembly the cake
Fresh strawberries, cut in half lengthwise
Whole fresh strawberries
  1. Biscuit Joconde: Preheat the oven to 190°C (375°F). Line a sheet pan (30cm x 40cm) with a Silpat or spray the pan lightly with nonstick spray, line with parchment paper, and spray the parchment. Sift the flour in a bowl and set aside.
  2. Place the eggs, almond flour, and icing sugar in the bowl of a stand mixer fitted with the whisk attachment and mix on medium-speed until light and fluffy. Transfer the mixture to a large bowl and set aside.
  3. Whip the egg whites in a clean bowl with the clean whisk attachment on medium speed for about 45 seconds, until foamy. Add slowly the sugar then increase to medium-high speed and whip until the whites are glossy with soft peaks. Do not over beat!
  4. Fold the flour and egg whites gently into the egg mixture in 3 additions, starting with the egg whites and finishing with them. Whisk about one cup of the batter into the melted butter and then fold gently with the remaining batter. Pour the mixture into the prepared pan and, using an offset spatula, spread it in an even layer, making sure that it reaches into the corners. Bake for about 10 to 12 minutes, until a skewer inserted in the center comes out clean. Do not over bake. Set on a cooling rack and cool completely.
  5. Making the mousseline: Line a small sheet pan with plastic wrap. In a medium stainless steel saucepan, combine all but 1/4 cup of the milk, 33g of the sugar, and the vanilla bean seeds and pod. Stir with a whisk and place over medium heat.
  6. In a medium bowl, whisk the cornstarch and the flour together with the remaining 33g of sugar. Add the 1/4 of milk you set aside and whisk in the egg yolks.
  7. When the milk comes to a boil, turn off the heat and remove the vanilla bean. Whisk half of the hot milk mixture into the yolk mixture. Strain the egg yolk mixture into the saucepan with the remaining milk. Turn the heat back onto medium and whisk the mixture, making surto to whisk everywhere. As soon as you feel that the mixture is becoming slightly think on the bottom, remove it from the heat and whisk for about 30 seconds. Return to medium heat and bring back to a boil, whisking constantly. Cook, whisking or 1 minute to cook out the starch flavour.
  8. Immediately remove it from the heat and transfer to the prepared pan. Spread in an even layer and place another sheet of plastic directly on topo. Place the sheet pan in the refrigerator and chill for at 1 hour.
  9. To finish the mousseline, remove the pastry cream from the refrigerator and bring it to room temperature. Make sure that your butter is nice and soft. Both components should be around 60ºF/16ºC. Place the cream in the mixer fitted with the whisk attachement and whisk on high speed for 1 minute. Scrape down the sides of the bowl and whip for another minute on high. Ad the soft butter and ship until de butter is homogenized and the mixture is glossy.
  10. Syrup:Bring to a boil the sugar and water. Remove from the heat and cool. Add the raspberry liqueur and refrigerate until you are ready to use it.
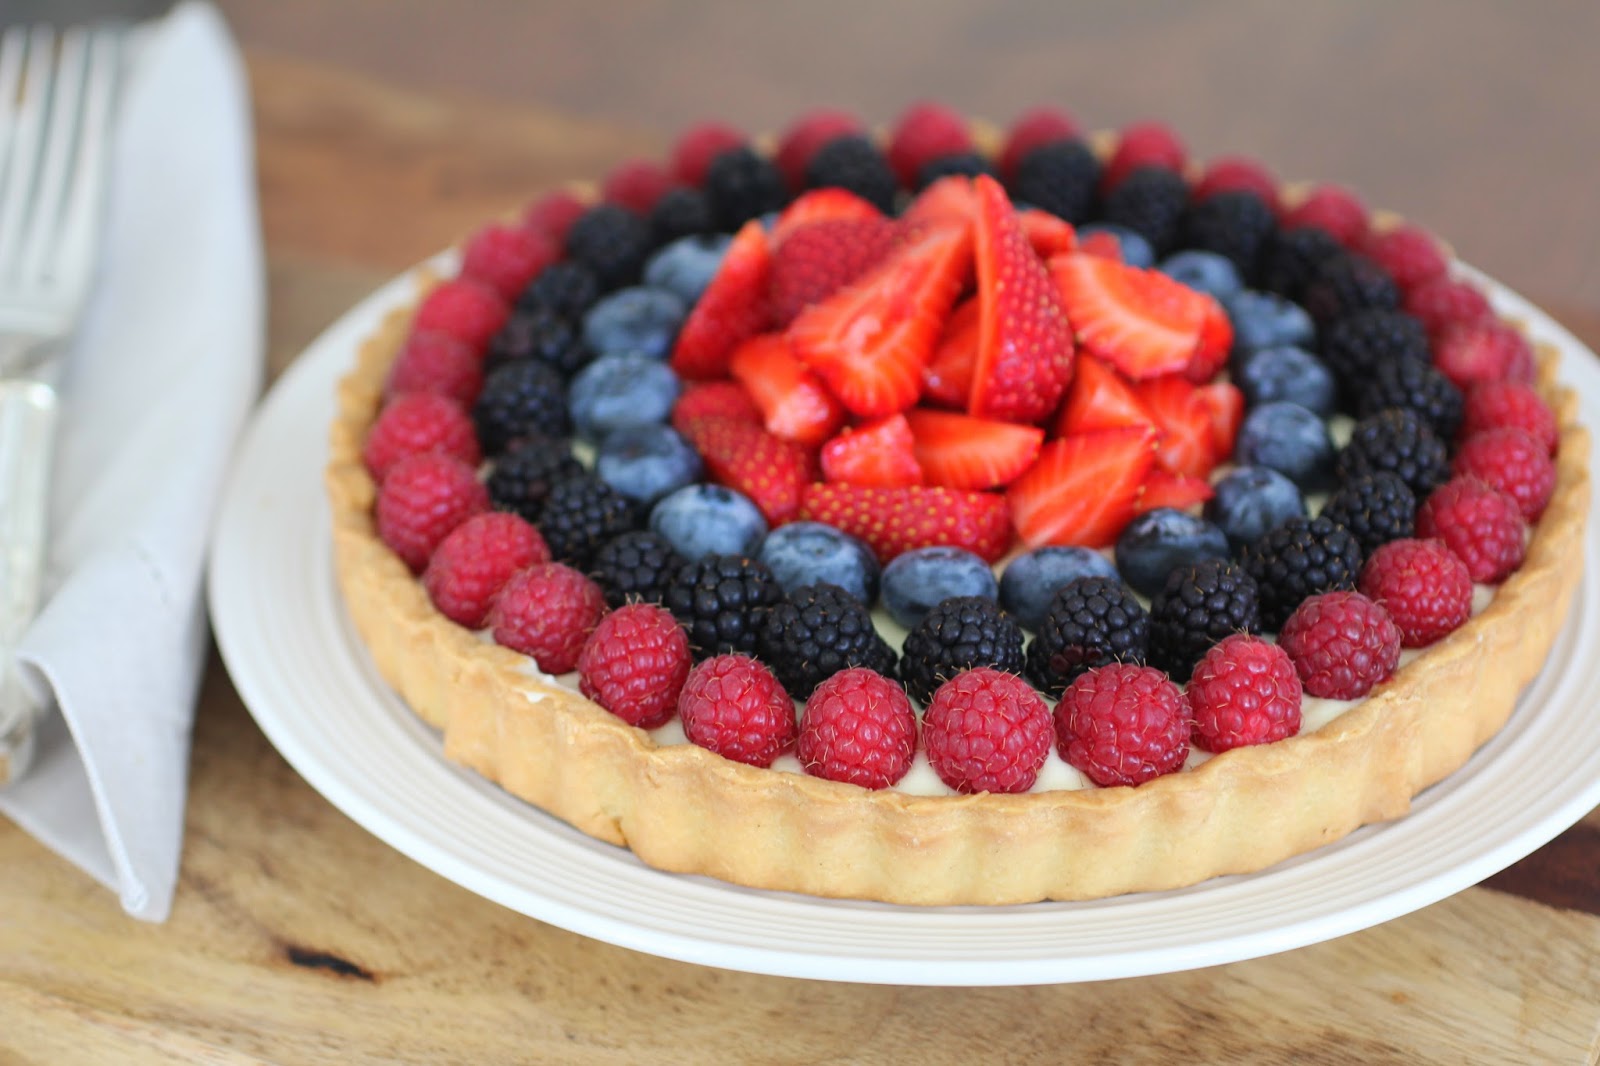
  11. To assemble the cake: Cut two disks of the biscuit joconde. Place one disk of the biscuit joconde into the bottom of a 7-inch/17cm spring form pan. Using a pastry brush, brush about half of the syrup onto the top of the cake. (You know you have enough syrup in the cake if you press down on the cake and hear a “squish,” like that of a full sponge.). Slice 12-15 of the strawberries in half. They should be the same height. Place the strawberries on top of the cake in a ring with the sliced half of the strawberries against the side of the spring form pan.
  12. Spread a thin layer of  mousseline cream onto the top of the cake. Pipe more mousseline in a line upwards between each strawberry. Using a flat metal spatula, spread the crème out so that any air pockets are filled. Stand up the remaining strawberries (you may trim them at the base so that they're all the same height). Be generous with the strawberries. Pipe a generous layer of cream on top of the strawberries. Smooth out with a flat metal spatula.
  13. Settle the other disk of the cake and brush the syrup onto the cake, rocking it gently from side to side so that the filling "glues" it into place.
  14. Refrigerate the fraisier for at least 30 minutes (up to 6 hours).
  15. Chantilly cream: Whip the cream in a small bowl with sugar and the vanilla bean seeds.
  16. Unmold the cake and decorate it with the chantilly cream and fresh strawberries and chill it again for 20 minutes before serving.

Chocolate Baileys Mud Cake

IMG_8556

Vacations, cold weather and good food. This is the summary of what happened in the last few weeks. It is likely that in the last 15 days I have eaten better and more than in the second half of 2014. I do admit that I also rested and slept more since Christmas than in the last 6 months, and for sure, it was the coldest week since the beginning of this winter.

Despite the rush that was around Christmas, I've been enjoying to start the new year with tranquility and I am also appreciating more the winter time. And now, without that excitement from the beginning of my first winter in Canada, I enjoy every snow falls, each flake I see through the windows and the transformation of nature to receive this season that is loved by many but hated by many others. And I? I love It! Of course, it could last less than six months ... but even so, see this city that is already beautiful decorated in all white is wonderful!

Anyway, as I am more quiet these days, I have also cooked more. I am preparing lunch and dinner every day and my new year's resolutions to eat more at home and use more my cook books has shown so easy to be fulfilled. I have done less desserts than I would like to do, but one afternoon last week, with external temperatures nearing -30 ° C, nothing better than baking a chocolate cake ... and as you know, the smell of a cake baking is so good, but when is a chocolate cake is even better!

Well, this recipe is very easy to be prepared, it does not require a stand mixer and also you do not have to expect the cake to cool completely before eat, which is perfect! The cake is very moist, the Irish cream taste enhance the chocolate flavor and gives a great satisfaction on every bite, I really recommend it! If you are not a fan of the drink, you can replace it with milk (which will work, but it will lose a little bit the whole experience), or a mixture of milk and coffee, Amaretto or Frangelico, for example. All work well, but surely  Baileys is my favorite! The success of the cake is also in the choice of a good chocolate, I used a 70% Valrhona and I would definitely recommend the brand.

So that's it, I hope you have spent a great Christmas and that 2018 comes with great achievements and happiness to you all!

See you!


Preparation time: 15 minutes
Baking time: Approximately 50 to 55 minutes
6 to 8 servings

Cake
150g unsalted butter, cut into 2,5cm cubes
100g high quality chopped dark chocolate
100g granulated sugar
100g brown sugar
50g Dutch cocoa powder, sifted
180ml Baileys Irish Cream®
170g all purpose flour
1 1/2 teaspoon baking powder
1/2 teaspoon baking soda
1/2 teaspoon salt
3 eggs at room temperature

Chocolate-Baileys Ganache200g high quality dark chocolate chopped (70% cocoa)
100ml Baileys Irish Cream®
100ml heavy cream
1/4 teaspoon salt
15g unsalted butter

  1. Cake: Preheat oven to 160ºC (325ºF). Grease an 21cm cake tin and line the bottom with parchment paper. Fill a medium saucepan with about 2,5cm of water and bring to a slow simmer. Place the butter, chocolate, both sugars, cocoa powder, and Baileys into a large heatproof bowl over pot of simmering water. Be careful, don't let the bowl does not touch the water).  Melt the mixture, stirring often, until smooth. Remove from the water bath and let stand aside for about 8 minutes to cool.
  2. In a separate bowl, whisk together the dry ingredients and set aside.
  3. Add eggs, on at a time, into the chocolate mixture, whisking after each addition.  Sift in the dry ingredients and bold it into the chocolate mixture using a large spatula until just combined, do not over-mix the batter.
  4. Transfer the mixture into the prepared cake pan and bake for about 40-50 minutes, or until a thin skewer inserted through center comes out with only a few moist crumbs and cake no longer jiggles when the pan is moved. Do not over bake the cake. Remove cake from the oven and let it to rest for about 15 minutes before removing from the pan.
  5. Ganache: In a small saucepan, bring the Baileys, cream, and salt just to a boil. Pour over the chocolate and let it sit for about 2 minutes. Whisk the mixture until completely smooth, and add the butter pieces and mix till melted. Let the ganache rest for 5 minutes (give it a stir from time to time) until it is thickens slightly. If you wait too long it will harder.
Spread the ganache over the cake and enjoy!

Almond Cake

IMG_8787

Thursday I went out with a dear friend and we spent most of the day together. We went shopping in a local supermarket and we had lunch. Such a great time! Yesterday I met another friend and we spent the afternoon in the mall, peering in the windows announcing the winter sales and of course, we chatted a lot. I just loved my last two days!

So yesterday I went home wondering why I don't do it very often. I always was a person of few but good friends, so along the way decided that I will do everything possible to enjoy moments like these, they are really invigorate and make me very happy!

Well life here is a delight! Every day is a learning experience, I learn a new word, or some aspect of Canadian culture ... life goes on, and it is very good! I miss few things about Brazil, but when it comes to family and friends .... the conversation changes. I miss so much the loved ones who are there, the conversations, the weekends surrounded by family and good food ... well, I miss them! Luckily we can communicate, we can see each other by skype and, despite the distance, we have received several visits from friends and family and we love to show some of our life here for them and have a great time with them.

Then today with some of that nostalgia in the air, I woke up thinking of a dear friend and my desire was to call her, make an afternoon snack and give a big hug in her. As the distance does not allow me, after lunch I decide to bake a cake that I'm sure she would love. I've done this cake several times and it is always very good, but today was different. Maybe it was the affection put into, but the cake was much better. The batter was lighter, more moist ... well, I think this special "ingredient" made all the difference.

I ate a slice of cake in the late afternoon accompanied with strawberries and a cup of tea. She was not here to talk with me, but after eating this tasty cake my heart was even more warm and in a way, I felt that despite the distance, she is not far away, she is here with me ...

Bon appétit!

IMG_8805
Preparation Time: 10 minutes
Baking time: Between 45 to 65 minutes
Makes 25cm cake
Recipe from the awesome David Lebovitz

Ingredients

1 1/3 cups (265g) sugar
225g almond paste
3/4, plus 1/4 cup (140g total) flour
1 cup (225g) unsalted butter, at room temperature, cubed
1 1/2 teaspoons baking powder
3/4 teaspoon salt
1 teaspoon vanilla extract
1 teaspoon almond extract
6 large eggs, at room temperature
  1. Preheat the oven to 162°C (325°F). Grease a 25 cm cake or spring form pan with butter, line the bottom of the pan with a round of parchment paper, then dust it with flour and tap out any excess.
  2. In the bowl of a food processor, grind the sugar, almond paste, and 1/4 cup (35g) of flour until the almond paste is finely ground and the mixture resembles sand.
  3. In a small bowl, whisk together the remaining 3/4 cup (105g) of flour, baking powder, and salt. Set aside
  4. Once the almond paste is completely broken up, add the cubes of butter and the vanilla and almond extracts, then process until the batter is very smooth and fluffy.
  5.  Add the eggs one at a time, processing a bit before the next addition. After you add all the eggs, the mixture may look curdled. Don’t worry; it’ll come back together after the next step.
  6. Add half the flour mixture and pulse the machine a few times, then add the rest, pulsing the machine until the drying ingredients are just incorporated, but do not overmix the batter.
  7.  Scrape the batter into the prepared cake pan and bake the cake for 45-60 minutes, or until the top is deep brown and feels set when you press in the center.
  8. Remove the cake from the oven and run a sharp or serrated knife around the perimeter, loosing the cake from the sides of the pan. Let the cake cool completely in the pan.
Storage: This cake will keep for four days at room temperature, well-wrapped. It can also be frozen for up to two months.

Raspberry and White Chocolate Macarons

IMG_8899

Last week I saw tulip bulbs growing in some of my neighbours' gardens, a sign that spring is really starting and it warms my heart. This rebirth of nature, the end of the ice season and my university vacations just approaching, bring along a contagious energy and eager to enjoy every minute of life ... it brings joy!

I always thought that afternoon teas and spring time was bests friends so, last weekend I hosted an afternoon tea for some friends at my place and it was all about to celebrate and give welcome to the most expected season. Of course, it was also a pretexte to have a good chat with the girls. We had such a great time, I love it! The menu was simple, but it did well the job ... so, today I present you a recipe which is, in my opinion, a "must have" on an afternoon tea: macarons! These ones were filled with white chocolate and raspberries, but feel free to use the filling of your choice. My idea of doing these were to pair the fruit that I love and, at the same time, make something that is very feminine. I loved the end result and I hope you also enjoy!

Oh, and the tulips? Once flourish, I'll show you some photos!


Preparation time: 25 minutes
Drying time: 1 hour
Baking time: 15 minutes
Makes: 40 macarons

Ingredients - Macarons Shells
110g egg whites, at room temperature
40g granulated sugar
225g icing sugar
125g almond flour/meal
Optional: powdered/gel food colouring

White chocolate and Raspberry Ganache
150g high quality white chocolate, finely chopped
60g raspberry puree
15g unsalted butter, at room temperature
15ml framboise (optional)
  1. Macarons: Line two baking trays with silpat or good quality baking paper.
  2. Place the almond flour and icing sugar in a food processor and pulse to grind it as fine as possible.
  3. Using an electric mixer with the whisk attachment, beat egg whites and salt in a medium mixing bowl until it reaches soft peaks. With the mixer on high-speed, gradually add granulated sugar and beat until it reaches stiff peaks. Don’t over beat it.
  4. Add meringue to the dry mixture and mix together with a spatula, quickly at first to break down the bubbles in the egg whites, then mix carefully as the dry mixture becomes just incorporated and the mixture starts to become shiny again. The mixture shouldn’t be so stiff that it holds its shape without moving at all, but it shouldn’t be so loose that is dissolves into itself and dos not maintain the ribbon; it is better for the mixture to be slightly stiff than too loose.
  5. Transfer the mixture to a pastry bag with the 1cm round piping tip. Pipe circles about 3cm wide on your prepared trays, leaving about 3cm space around each one. Lift up the sheet pan and tap the bottom of the pan to spread the batter evenly and smooth any peaks left by the pastry bag.
  6. Leave to dry for about 60 mins, until when you press the surface of one gently it does not break/stick to your finger. This will help prevent any cracking and help the feet to form on the macs.
  7. Preheat your oven to 140°C (285°F), depending on your oven (fan-forced ovens may need to be set as low as 100°C or another ones at 150°C, it really depends).
  8. Bake for 15 minutes, depending on the size of your shells and of your oven. Carefully test if the base of the shell is ready by gently lifting one and if it’s still soft and sticking to the baking paper, then it needs to bake for a few minutes longer.
  9. Remove from the oven and cool on the tray for a few minutes, then gently remove from the sheet and place on a wire rack to cool.
  1. Ganache: In a small saucepan, bring raspberry puree just to a boil. Pour over the chocolate and let it sit for about 2 minutes. Whisk the mixture until completely smooth, and add the framboise, if using, and butter pieces and mix till melted. Let the ganache rest for about 20-25 minutes (give it a stir from time to time) or until it is thickens enough to transfer to a pastry bag. If you wait too long it will get hard and it will be difficult to pipe it into the macaron shell.
  2. Fill the Macarons with the ganache, starting in the center, pipe 1/2 tablespoon of the ganache, be careful to not reaching the edges. Top with a second macaron and press gently to spread the filling to the edges. Repeat with the remaining macarons and ganache.

Opera Cake - Gâteau Opéra

IMG_3935
Preparation time: 2 to 3 hours
10 to 12 servings

Genoise au chocolat
165g eggs, at room temperature
90g caster sugar
70g all purpose flour
20g dutch cocoa powder

Biscuit Joconde
165g icing sugar
165g almond meal/flour
220g eggs, at room temperature
40g all purpose flour
105g egg withes, at room temperature
30g caster sugar
50g unsalted butter, melted at room temperature

Chocolate Ganache
700g heavy cream
300g high quality semi sweet chocolate, chopped
400g high quality dark chocolate, chopped

Crème Mousseline au Café
165g eggs, at room temperature
108g egg yolks, at room temperature
330g caster sugar
100g water, at room temperature
400g unsalted butter, at room temperature
Coffee extract

Coffee Syrup
Prepare a syrup with water, sugar and coffee.

Glaçage Miroir au Chocolat
300g chocolate ganache
60g glucose syrup
A few drops of red gel food colouring 
  1.  Genoise au chocolat: Preheat the oven to 190°C (375°F). Line a sheet pan (30cm x 40cm) with a Silpat or spray the pan lightly with nonstick spray, line with parchment paper, and spray the parchment. Sift the flour, baking powder, and cocoa powder in a medium bowl and set aside.
  2. Place the eggs and sugar into a large heatproof bowl over pot of simmering water. Beat them constantly until it reach a 45°C temperature, or until the sugar cristal had been dissolved. Place the mixture in the bowl of a stand mixer fitted with the whisk attachment and mix on medium-high speed for about 10 minutes.
  3. Transfer the mixture to a large bowl and fold the dry ingredients in 3 additions into the batter. Pour the batter into the prepared pan and, using an offset spatula, spread it in an even layer, making sure that it reaches into the corners. Bake for about 10 to 12 minutes, until a skewer inserted in the center comes out clean. Set on a cooling rack and cool completely.
  4. Biscuit Joconde: Preheat the oven to 190°C (375°F). Line a sheet pan (30cm x 40cm) with a Silpat or spray the pan lightly with nonstick spray, line with parchment paper, and spray the parchment. Sift the flour in a bowl and set aside.
  5. Place the eggs, almond flour, and icing sugar in the bowl of a stand mixer fitted with the whisk attachment and mix on medium-speed until light and fluffy. Transfer the mixture to a large bowl and set aside.
  6. Whip the egg whites in a clean bowl with the clean whisk attachment on medium speed for about 45 seconds, until foamy. Add slowly the sugar then increase to medium-high speed and whip until the whites are glossy with soft peaks. Do not over beat!
  7. Fold the flour and egg whites gently into the egg mixture in 3 additions, starting with the egg whites and finishing with them. Whisk about one cup of the batter into the melted butter and then fold gently with the remaining batter. Pour the mixture into the prepared pan and, using an offset spatula, spread it in an even layer, making sure that it reaches into the corners. Bake for about 10 to 12 minutes, until a skewer inserted in the center comes out clean. Do not over bake. Set on a cooling rack and cool completely.
  8. Ganache: In a small saucepan, bring the cream just to a boil. Pour over the chocolate and let it sit for about 2 minutes. Whisk the mixture until completely smooth. Reserve 300g of the ganache for the Glaçage Miroir au Chocolat and cover with plastic wrap. Place the remaining ganache in the refrigerator and stir from time to time (10 minutes intervals).
  9. Crème Mousseline au Café: Place the eggs, egg yolks, and 1 tablespoon of sugar int he bolw of a stand mixer fitted with the whisk attachment and mix on medium speed for about 10 minutes. Make a syrup with the water and the remaining sugar until it reaches 118°C. When the syrup is ready, remove the pan from the heat. Turn the mixer to medium-high speed, and slowly ad the syrup, pouring it between the side of the blow and the whisk. Whip the mixture until it is at room temperature.
  10. Reduce the speed to medium and add the butter, a few pieces at a time. If at any point the mixture looks broken, increase the speed and beat to re-emulsify it, then reduce the speed and continue adding the butter. Add the coffee extract and mix until it is well incorporated. Transfer the mixture to a covered container and place in the refrigerator until you need it.
To assembly the cake:
  1. Divide the Biscuit au Chocolat and the Genoise in two parts each. Put 1 biscuit au chocolat square on a plate, then brush generously with one quart of coffee syrup. Spread one third of ganache evenly over top with a cleaned offset spatula, spreading to the edges. Transfer to the refrigerator until it firms.
  2. When it sets, spread one third of the coffee mousseline evenly over top with a cleaned offset spatula, spreading to the edges. Put 1 genoise square over the mousseline then brush with another part of the syrup. Spread another layer of the coffee mousseline and transfer to the refrigerator until it firms.
  3. When it sets, spread another portion of the ganache. Put the second square of the biscuit and brush with the syrup, cover with the ganache again (this time make a very thin ganache layer - half of the amount that you did on the other layers) and transfer again to the refrigerator. After that cover with the remaining mousseline and return to the fridge to make the miroir.
  4. Miroir au chocolat: Place the reserved ganache (300g) with the other ingredients in a saucepan and bring to medium heat until everything is well incorporated. Remove pan from the heat and let cool slightly. It should be like a sauce, but not too hot because it could melt the mousseline.
  5. Cover the cake with the chocolate glaze and chill cake until glaze is set, about 30 minutes, then trim edges slightly with a sharp serrated knife.
Opéra cake can be made 2 days ahead. Cover sides with strips of plastic wrap and top of cake loosely with plastic wrap (once glaze is set) and chill cake. Remove plastic wrap from top immediately after removing cake from refrigerator and serve it.

Panna Cotta with Cherry Compote

IMG_7863

I like the experience of seeing and living four distinct seasons, each with its own special and unique beauty. I like to enjoy the green rebirth of spring, tulips making room for flowers on the next season. In summer, I like to listen the intense summer rains and  have picnics in the park on sunny days. After that, I feel gifted to see the colours changing for welcoming the autumn, all the comforting food that the season calls pairing with a glass of wine to relax after a long day. And the winter, it also brought its own beauty. The white landscapes, the days of blue sky contrasting with the snow that fell on previous day, trees covered with what you can almost say it was a cotton storm. In short ... it's impossible not to be dazzled by what nature offers us throughout the year.
IMG_7837

But better than all this, is be able to enjoy all that each season brings to our table, each of the gives us the best that nature can offer and I am fascinated by what I can do with each food at its peak.
We was in summer when I made this Panna Cotta, and the scent of freshly picked cherries appeared throughout the city, from large supermarkets to épiceries of each quartier. With different colours and shapes, juicy, and sweet. They are my favorites!

The panna cotta was actually just an excuse to use this compote. Despite being one of my favorite desserts (Reason? Easy to prepare and delicious!), it had not appeared in my kitchen since I moved here in Québec. But it's never too late, isn't it? This panna cotta in particular was the best I've ever done! Very creamy and with the right amount of sugar, which is ideal to pair with those cherries that already had all the sweetness you will need ... A hundred points to the panna cotta and a trophy for the jam! Surely a dessert that will appear more often here.

Bon appétit et bonne fin de semaine!

IMG_7887
Panna Cotta Preparation Time: 10 minutes
Cherry Compote Preparation Time: 15 minutes
Makes 6 servings

Panna Cotta3 gelatin sheets
2 cups half and half
1 cup heavy cream
1/3 cup sugar
1 vanilla paste

Cherry Compote2 cups pitted fresh cherries
2 tablespoon sugar
2 tablespoon cassis liqueur
  1. Panna Cotta: Soften the gelatin sheets 500ml of cold water for 5 to 10 minutes.
  2. Heat the heavy cream, half and half, vanilla paste and sugar in a saucepan. Once the sugar is dissolved, remove from heat
  3. Lightly oil 6 custard cups with a neutral-tasting oil.
  4. Wring the gelatins sheets out the cold water and stir them into the warm Panna Cotta mixture until the gelatin is completely dissolved.
  5. Divide the Panna Cotta mixture into the prepared cups, then chill them until firm, which will take at least two hours but I let them stand at least four hours.
  6. Cherry compote: Bring the cherries and sugar to a boil in a large heavy saucepan; reduce heat to medium-low. Simmer until cherries are softened and start to release juices, about 10 minutes. Using a slotted spoon, transfer cherries to a medium heatproof bowl. Simmer juices until thick enough to coat the back of a spoon, 15–20 minutes, remove from heat and add the cassis liqueur. Pour reduced syrup over cherries. Serve with the panna cotta.

Poppy Seed & Clementine Pound Cake

IMG_9814

I moved from my old apartment about 2 weeks ago and I'm loving my new quartier! Praline, my adorable little dog, already got used to our new home, my Amore is very happy with the choice of the apartment and I turned our lovely place into a home. Also, I've already discovered the best supermarket in town (just in front of my building), one of the best boucheries in town, a fantastic chocolaterie and a small grocery store which was the responsible for today's recipe.

Well, last week I was walking around the local businesses and suddenly I decided to enter in this charming grocery store, it did not give me much hint of what I would find. Well, I can say that was a lovely surprise! There were several large cans with bags on the side and large utensils so that we could serve ourselves. I looked at everything calmly and carefully, and what I found was one of the best discoveries of the last few months! The main idea of ​​this place is selling various types of grain, flour, chocolates, spices, tea, coffee, dried pasta, cookies, nuts and sweets in general in bulk. I found so much cool stuff and excellent quality products that, in the end, I had my hands full of so much newness and some of the ingredients that I don't like leaving missing in my pantry. It reminded me my hometown in Brazil.  I remember when I was a child, it had some grocery stores in my town and my mom used to buy many foods that way. I also remember that on Saturdays, market day, there were several stalls selling spices and flours that way. I loved everything! Especially the scents and colors that came from those big bags. And, entering the grocery store last week, I felt the same familiar smells and that same feeling of comfort ... maybe that's why I liked the place so much! It remembered me my mother and my childhood!

IMG_9843

So, I came home with a huge amount of the best almond flours that I've ever bought, a pure Belgian dark chocolate, a delicious organic green tea, and a lots of poppy seed. I knew that I would like to bake a cake, a citrus one, and I immediately remember of this great recipe from Dorie Greenspan. It is a delicious cake! Very moist and with a great dense texture from the seeds. I just loved it! I did the whole recipe, something that I'm not used to (we're just 2 at home), and it was just enough to 2 days. We ate it in the breakfast, afternoon tea, and as a snack late of night. The clementine flavour was delicate, but at the same time present. It was just a great way to use those poppy seeds and I'm looking forward to do it again.

Hope you like too!

Bon appétit!

IMG_9783 IMG_9799
Preparation time: 10 minutes
Baking time: 50 to 60 minutes
Makes 10 servings
From Baking Chez Moi, Recipes from My Paris Home to Your Home Anywhere, by Dorie Greenspan

Ingredients

1 1/2 cups (204 grams) all-purpose flour
1 teaspoon baking powder
1/4 teaspoon fine sea salt
Zests of 3 large clementines (you can use 1 orange or 2 tangerines instead)
2 tablespoons clementine's juice
4 large eggs, at room temperature
3/4 teaspoon pure vanilla extract
1/2 cup (120 ml) heavy cream, at room temperature
5 1/2 tablespoons (78 grams) unsalted butter, melted and cooled
1/3 cup (47 grans) poppy seeds

  1. Preheat the oven to 190ºC (350ºF). Butter a 20-x-10-cm (8 1/2-x-4 1/2-inch) loaf pan, dust with flour and tap out the excess.
  2. Whisk the flour, baking powder and salt together in small bowl. Reserve.
  3. Put the zest of the clementines into a large bowl and add the sugar. Using your fingertips, work the ingredients together until the sugar is moist and aromatic.
  4. One by one, add the eggs, whisking vigorously after each addition. Whisk in the juice, vanilla, and heavy cream. Switch to a flexible spatula and add the dry ingredients in 2 or 3 additions, stirring only until they disappear into the batter.
  5. Stir in the butter in 2 or 3 additions and finish by stirring in the poppy seeds. Scrape the batter into the prepared pan and smooth the top.
  6. Bake the cake for about 50 to 60 minutes - it depends of your oven - rotating the pan at the 30 minutes mark. Transfer the cake to a cooling rack and let it rest for 5 minutes. Turn the cake out and let it cool to room temperature.
Serving: The cake is ready to serve when it is cool. But it will better if you let it rest for a day; wrap in plastic film and tuck it.

Storing: Well wrapped, the cake will keep for up to 4 days at room temperature. Wrapped airtight, it keeps for up to 2 months in the freezer.

IMG_9847

Honey and Berry Tart

IMG_7940
Life goes quiet nice here on Canadian soil. As the summer is way too far from now and I miss it so much, I decided to publish this recipe that I made on last august, when the summer was at its peaks and rainy days was a part of life. But what I miss most is the long days, when we can enjoy good outdoor temperatures, nature and we can go outside with Praline, who is by the way super adapted and loves to walk in the parks close to our home. However, enough complaints for today, I love winter too and it is awesome to enjoy every aspect of each season of the year, is something that I didn't have in Brazil and it is one of the best things about my new life in North America.
 
One of the good things about winter is I can seek new marchés, épiceries, boucheries, fromageries, etc. The Quebecois highly value what they produce here and it is very interesting that even in this time of the year the local markets, supermarkets, delis, etc., are very proud to display and sell products made nearby. Still, in winter time, most part of the products are imported, but when the spring comes, everything changes and we can enjoy the local products. Nevertheless, for now we can find the Charlevoix cheeses, the duck and foie gras of Canard Goulu farms, maple syrup made throughout the province, the smoked salmon from Fumerie Québecoise .... and so on. I could do an entire post only with the delights made here and in spite of not being Québecoise, I'm very proud of what they produce here. It is something that I really appreciate in this city!
 
Well, coming back to the recipe. The honey pastry cream is very simple to make, but at the same time give a very interesting result. It is not so sweet as the regular pastry cream is, but  it is surely well balanced. The base is a pâte brisée dough, which you can use for another sweet or even savoury tarts, with a lemon cream it is fantastic! You can also top the tart with many kind of fruits. Be creative and use whatever you have in your home, it is an absolutely flexible recipe and I love this kind of recipes, don't you?
So, that's it! It feels like -18°C outside, but with this tart I could dream about sunny and hot days for long time!
See you!
IMG_7932
Preparation time: 30 minutes
Baking time: Approximately 20 to 25 minutes
6 servings


Pâte Brisée
200g flour
1/2 teaspoon salt
100g chilled unsalted butter, cut into 1 cm cubes
1 large egg, beaten to blend
About 2 tablespoons ice water

Filling - Honey Crème Patissière
1 and 1/2 vanilla bean
30g cornstarch
75g honey
350ml milk
4 egg yolks

Melted white chocolate to assembly
Mixed berries
  1.  CRUST: Blend flour, and salt in processor 5 seconds. Add butter, using on/off turns, blend until mixture resembles coarse meal. Add 1 tablespoon ice water and blend until most clumps form, adding more ice water by teaspoonfuls if dough is dry. Gather dough into ball; flatten into disk. Wrap in plastic and chill until firm, at least 45 minutes. TIP: The dough could be made 1 day ahead. Keep chilled. Let soften slightly at room temperature before rolling out.
  2.  Preheat oven to 190ºC (375ºF). Roll out the dough into a disk on a floured surface. Transfer the dough to a tart dish. Transfer again to the refrigerator and let stand 15 minutes. Line crust with foil; fill with dried beans or pie weights. Bake until sides of crust are set, about 15 to 20 minutes. Remove the foil and beans. Pierce bottom of crust in several places with fork and continue to bake until the crust is golden and brown, about another 15 to 20 minutes. Cool on a rack.
  3. FILLING: Put the milk in a saucepan (reserve 1/2 cup to dissolve the cornstarch). Scrape the vanilla seeds into the milk and throw in the pod. Bring just to a boil, remove from the heat, cover, and set aside to infuse for 10 to 15 minutes. Beat the yolks and honey to pale thick ribbons. Gradually whisk the milk into the egg mixture in a thin stream. Dissolve the cornstarch into the milk that was reserved, add it to the misture and bring to a boil over medium heat, stirring constantly until the mixture thickens. Strain and sete aside to cool with a buttered piece of waxed paper on top to prevent a skin from forming.
  4. To assembly, pincel the bottom of the crust with the melted chocolate, top the filling and cover with berries. Chill tart until serving.

Raspberry Cheesecake

IMG_0285
July is almost over. It was a month of many changes, but it was also a month that brought lot of calm. It was a month of reconciliations,  discoveries, a lot of thought on life... it was a month of many fruits and vegetables harvest. In resume, it was a great month!
The first days were dedicated to moving from my old apartment and the organization of the new house. I took some rest on the following days. Thereafter, I just felt that I need to cook more often and make peace with the blog. By mid-July, I had already discovered a lot of beautiful places and stores in my new quartier. We had a lot of fresh air, flowers and fruits. It is the fruit picking season and I picked a lot of blueberries, corn, tomatoes, strawberries and raspberries.

The last weekend of the month could not be different. I had two bucolic, hot and rainy days. I picked some raspberries on Saturday morning and visited some farms on Île d'Orléans. And finally, I made this beautiful and delicious cheesecake. Simple things, but definitely are those that deserve to be lived!


IMG_0240IMG_0159
The cheesecake, as well as my weekend, was perfect! It is rich, luscious and creamy, delicately tangy and paired with a raspberry coulis, which gives to the cheesecake a scent of fresh fruit. It has well balanced flavors for sure. It is a winning dessert and I could not ask for anything ... just another day and desserts like that.
Finally, I took some pictures of my walk through the Île d'Orléans for you to know a little more of Québec. :) I hope you like it!
Bon appétit!
IMG_0132
IMG_0112
IMG_0177
IMG_0178
IMG_0188
IMG_0186


Preparation time: 20 minutes
Baking time: 60-70 minutes
Resting time: At least 6 hours
Makes 8-10 servings

Ingredients for the crust
1-1/2 cup finely ground graham crackers
2 tablespoons unsalted butter, melted

Ingredientes for the raspberry coulis
200 grams raspberries
2 tablespoons sugar

Ingredients for the cream cheese filling
750 grams cream cheese, at room temperature
1-1/2 cup sugar
pinch of salt
Zest of 1 lemon
1 tablespoon lemon juice
1 teaspoon vanilla paste
4 large eggs, at room temperature


  1. Preheat oven to 175ºC/350ºF. Wrap exterior of a 9-inch springform pan (including base) in a double layer of foil; set aside.
  2. For the base: Stir together cracker crumbs, melted butter, and 2 tablespoons sugar in a medium bowl. Press crumb mixture firmly onto bottom of pan. Bake until set, about 10 minutes. Let cool in pan on a wire rack. Reduce oven temperature to 160ºC/325ºF.
  3. For the cream cheese filling: Put the zest of the lemon into a large bowl and add the sugar. Using your fingertips, work the ingredients together until the sugar is moist and aromatic. Put cream cheese in the bowl of an electric mixer fitted with the paddle attachment; mix on medium speed until fluffy, about 3 minutes. With mixer on low speed, add sugar in a slow, steady stream. Add salt, vanilla and lemon juice; mix until well combined. Add eggs, one at a time, mixing each until just combined (do not overmix). Pour cream cheese filling over crust.
  4. Set cake pan inside a large, shallow roasting pan. Transfer to oven. Carefully ladle boiling water into roasting pan to reach halfway up sides of cake pan. Bake until cake is set but still slightly wobbly in center, 60 to 70 minutes.
  5. Transfer cake pan to rack; let cake cool completely. Refrigerate, uncovered, 6 hours or overnight. Before unmolding, run a knife around edge of cake.
  6. For the raspberry coulis: Process raspberries in a food processor until smooth, about 30 seconds. Pass puree through a fine sieve into a small bowl; discard solids. Whisk in sugar. Cover the cheesecake with the raspberry coulis and serve it along with some fresh raspberries.

Storing: The cheesecake can be stored in the fridge up to 2-3 days.IMG_0307
Back to Top